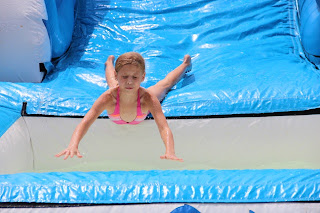
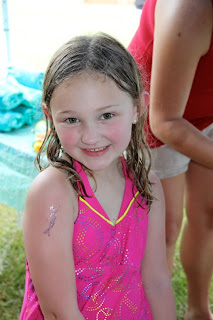
For entertainment I decided on 3 activities: Ocean themed water slide from Leaping Lizards, two water pillows that I learned how to make from Go Kid Yourself, and then mermaid glitter tattoos that I got from Etsy. I also had some scratch glitter art ornaments that I found at Michael's for like $2 set out but none of the kids really played with those. The highlight was obviously the water slide. Thanks to my awesome friend Jessica for these great action shots...those kids were getting some serious air and it was REALLY fast (more on how I know that later hahaha).
Albree and her bestie were inseparable!
Then it was time to eat:
I spent a good deal of time constructing the menu for the party. I always somehow feel the need to have at least 10 different things to eat and I always make twice as much as I really need for fear that something might run out. Well this party was no different. I also have to admit that one of my greatest joys in life are foods that are supposed to represent something else so everything on the menu had to be tied into the under the sea theme. I served pink lemonade as mermaid juice and a delicious blue sherbert punch that we labeled as ocean water. (All 3 gallons of the ocean water was consumed in less than an hour!). I also used an inflatable pufferfish pool I found at Target to use as the drink holder for ice and waters. I tore the labels off the water bottles and instead wrapped them in hot pink duct tape and placed a cupcake topper on that covered with clear packaging tape to seal the design. I also had Capri Suns available. The food consisted of PB&J sandwiches cut using an oval cookie cutter labeled as peanut butter and jellyfish clamwiches, hot dogs cut up to resemble crabs and octopuses I found here, and delicious mini chicken salad sandwiches my friend made that we labeled as Chicken of the Sea. Grapes were Sea Pearls, Strawberries were Shark hearts, Pickles as Sea Cucumbers, Goldfish crackers in real fish bowl, Spinach dip as Seaweed Dip and then a red bell pepper cut to resemble a crab. I also made mini fish bowls by pouring half a cup of blue jello in clear cups and sticking a swedish fish inside about an hour into them setting. Be aware that the fish will begin to dissolve after a day!
Tattoo Station:
I wanted my special girl to have a special outfit for her big day and after much searching I found a tutorial here that worked pretty well. Total out of pocket was about $10 and we are using it as our Halloween costume too with a different top.
Decorations: The table design is where I spent all the large majority of my time in planning. There were so many great ideas out there that it was hard to pick and choose which parts I wanted to use. Thanks to my SUPER talented and creative friend who came over at 9 am on a Saturday to help me assemble this party, We came up with a table that was all of our own. I knew that I wanted it to look like it was under the sea so I found this gorgeous teal shimmery wrapping paper at Hobby Lobby (40% off coupon used again) that I used as a table cover. Then amazingly our walmart had this entire party section divided off in different color schemes and there was a teal and a pink color. So I scored some teal tablecloths for less than a dollar apiece and taped those to the tables as table skirts. My Super friend I mentioned earlier found the burlap netting at a hobby store that was mislabeled for $1.99 instead of $19.99 so we scored that great deal and draped it across the front with starfish and seashells stuck in where we could. The banner was part of the digital package and I just traced the pennant design onto scrapbook paper that matched the color scheme and tied it with coordinating ribbon. The letters were cut on a friend's Cricut. Lastly the #*@#% balloon towers on each side were great in theory but the biggest stressor of all. They were easily constructed using a 10 foot 1/2" piece of plastic pipe from Lowe's that was cut in half and placed in a square block inside a flower pot and (I thought) secured with newspaper stuffings on each side. WELL, every time the wind blew they started looking like the leaning tower of Piza which led me in a constant battle with them for the entire 2 hours of setup prior to the party. THEN, to top it off, once I was sure that I had finely secured them with bags of beans in the flower pots, I go inside to get the remaining food and walk out to the pot busted and the pole blown half way across the yard. Luckily I somehow turned the pot around to the unbroken part and shoved the pole in there enough so that it stayed up for the remainder of the party. The ONLY way I would ever consider doing it again is for an indoor party. Though it really added to the decor, the hassle was in no way worth it.
The cake was actually homemade by me and I am in NO way a cake decorator. I got a kit by Wilton that they sell at Michael's (used a 40% off coupon to get it on sale) and just followed the instructions. I actually made a practice cake the month before and it turned out pretty much the same. The level of difficulty is definitely low. A family member made the cupcakes for me that we displayed on a cupcake tower that I made out of circles of foamboard and cans of vegetables. I took a salad plate, a dinner plate and a large mixing bowl that ended up measuring 10", 12" and 14" and used those as templates to cut out of the foamboard. The tutorials I found suggested using the precut cardboard cake circles but I could only find them sold in packages of like 8 of the same size and given that I needed 3 different sizes, that was going to be pretty expensive! So I improvised and it turned out fine. I covered the circles with wrapping paper of the same color scheme as the party and hot glued the edges with a sparkly tape that I found at Michael's. I used a can of vegetables between each of the first 2 layers that was wrapped in cardstock and then chose a larger can as the base for stability purposes. All in all the whole thing cost me like $5 out of pocket.
In lieu of doing party bags, I always like to make our guests a little something special for coming to the party. I saw in a family fun magazine an article on these adorable mermaid tails made out of beach towels that seemed fairly easy so I was hooked. I found these super cute towels at K-mart in the perfect color scheme for a little over $2 a piece after I used coupons ordering them online. I then just flipped over the top half about 2 inches down to make a sleeve and did a simple straight stitch across. I then tied my satin ribbon to a pencil and threaded it through the sleeve I created. The tail was created by cinching up the bottom and I used clear fishing wire to tie each section of the tail off. You could also use rubber bands to tie the bottom up. The girls loved having their very own mermaid tail to go home with plus it served as a towel to help dry off with.
Next we opened gifts. I had this grand idea of creating this huge clamshell she could sit in to open presents but at the end of the day I had to finally realize that not all things were going to be achieved and this was where I was willing to make the cut. She got a ton of really great gifts from her amazing friends and her nana and papa surprised her with a new bicycle. Good luck with that training Dad!


No comments:
Post a Comment